

An Ultimate Guide On Pan Card In India
PAN Card in India: Complete Guide (Apply, Update, Download & Link Aadhaar)
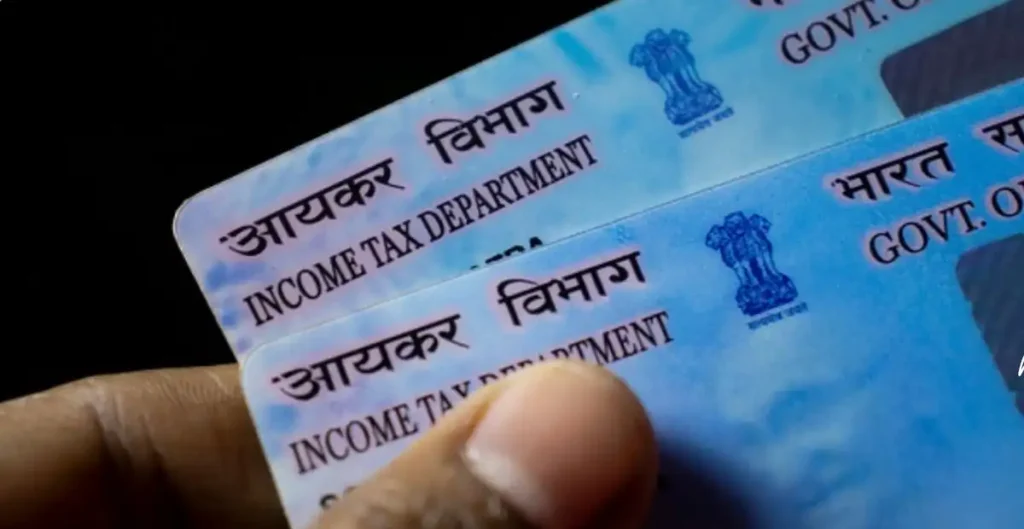
The Permanent Account Number (PAN) card is one of the most important documents in India. Issued by the Income Tax Department under the supervision of the Central Board of Direct Taxes (CBDT), the PAN card is a 10-digit alphanumeric identifier.
Whether you are filing income tax returns, opening a bank account, investing in mutual funds, or buying property, the PAN card is mandatory.
In this complete guide, we’ll cover everything you need to know about PAN in India – how to apply, documents required, fees, how to update, how to download e-PAN, and how to link your PAN with Aadhaar.
What is a PAN Card?
A PAN card is a permanent identification number given to every individual, company, or entity that pays taxes in India. It is unique to each holder and remains unchanged throughout a lifetime.
Key Features of PAN Card:
- 10-digit alphanumeric number (e.g., ABCDE1234F).
- Unique for every individual or entity.
- Issued by the Income Tax Department.
- Mandatory for financial transactions above a certain threshold.
Why is a PAN Card Important?
- Income Tax Filing – PAN is mandatory for filing ITR.
- Bank Transactions – Needed for deposits above ₹50,000.
- Property & Vehicle Purchase – Compulsory for transactions above ₹10 lakh
- Investments – Required for buying stocks, mutual funds, or opening a DEMAT account.
- Identity Proof – Serves as valid government-issued identity.
Without PAN, you may face higher TDS (Tax Deducted at Source) rates and restrictions on financial transactions.
Great — let me expand your section “How to Apply for PAN Card Online – Step by Step Guide” into a more detailed, SEO-friendly, humanized version so it becomes informative for readers and search engines alike.
Perfect Let’s rewrite and expand this in a friendly, step-by-step, layman-friendly blog format so even someone who has never applied for a PAN card before can easily understand. I’ll also add real-life examples wherever possible to make it relatable.
How to Apply for PAN Card Online – Step by Step Guide (With Real-Life Examples)
Thanks to digitization, getting a PAN card has become super easy. You no longer need to run to government offices, stand in long queues, or deal with endless paperwork.
Today, you can apply for a PAN card online in just a few clicks through authorized portals like NSDL (Protean eGov Technologies) and UTIITSL (UTI Infrastructure Technology Services Ltd.).
If you’re a student, a salaried employee, a business owner, or even someone planning to start freelancing, a PAN card is essential. It acts like a financial identity card for all your banking, taxation, and financial activities.
Step-by-Step Guide: How to Apply Pan Card In India Easily
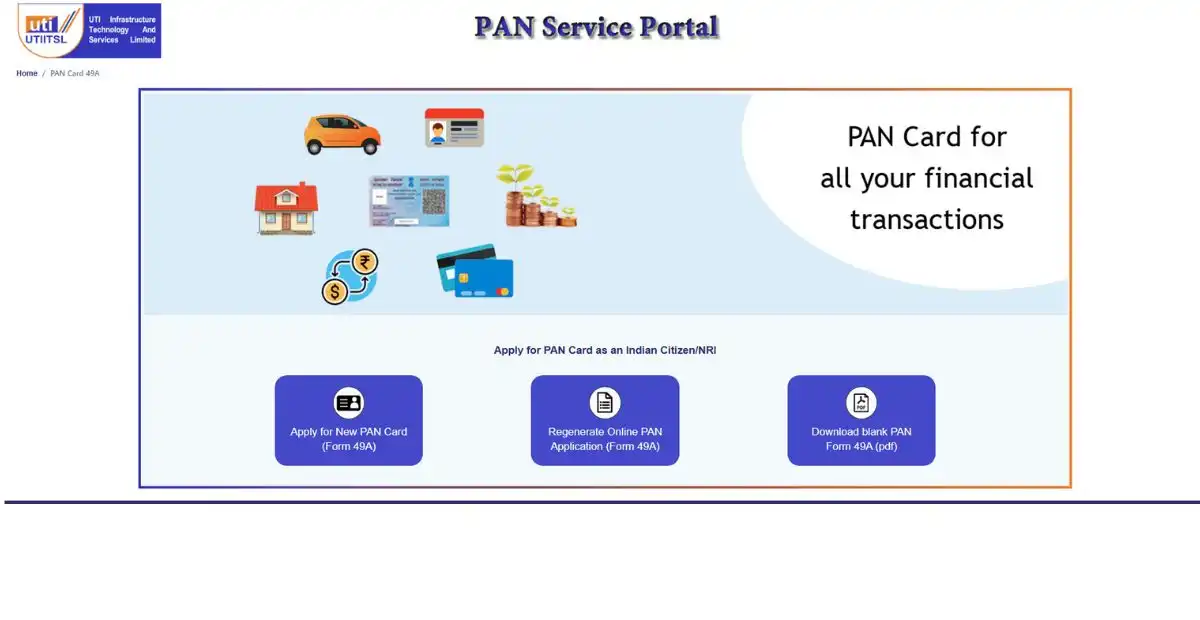
Step 1: Visit the Official Website
There are two official websites you can use:
Real-life example: Imagine you want to order food online. You can use Swiggy or Zomato — both deliver food, but you choose the one you’re comfortable with. Similarly, you can pick either NSDL or UTIITSL — both are government-authorized and safe.
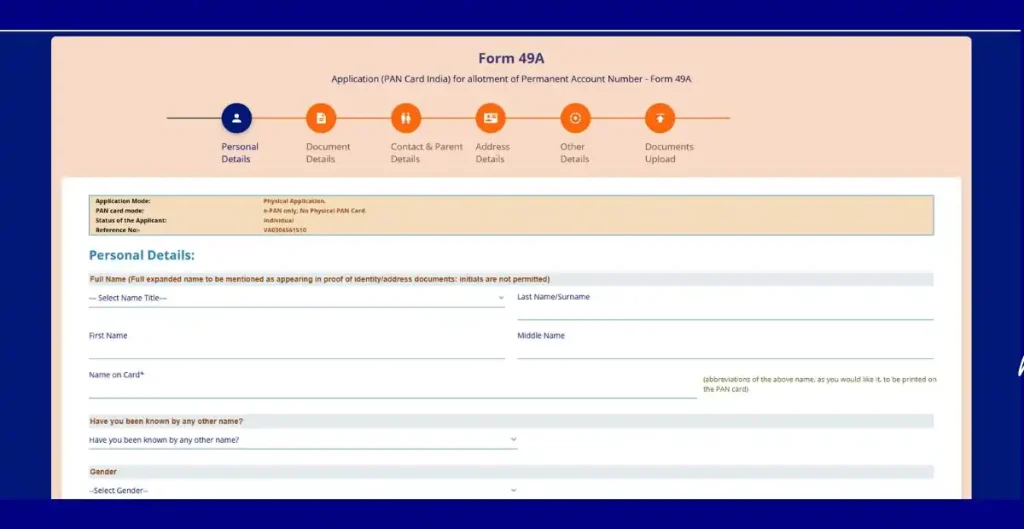
Step 2: Select the Correct Application Form
There are two types of forms:
- Form 49A – For Indian citizens (this is what 99% of people in India will use).
- Form 49AA – For foreign citizens/entities.
Tip: If you are an Indian living in Delhi, Mumbai, or even in a small town, you will fill Form 49A. Form 49AA is only for NRIs or foreign nationals.
Step 3: Fill in the Online Application Form
Here’s what you’ll need to fill:
- Full Name (exactly as it appears on Aadhaar)
- Date of Birth
- Gender
- Father’s Name (mandatory even if your mother is a single parent)
- Aadhaar Number (mandatory for new PAN applications)
- Address (residential or office)
- Mobile Number & Email ID (for OTP and updates)
Real-life example: If your Aadhaar says your name is Shivam Kumar Gupta, don’t write Shivam Gupta in the PAN form. Even a small mismatch can delay or reject your application.
Step 4: Upload Supporting Documents
You need to provide proof of identity, address, and date of birth. Accepted documents include:
- Proof of Identity (POI): Aadhaar card, Voter ID, Passport, Driving License
- Proof of Address (POA): Aadhaar, Passport, Bank Statement, Utility Bill (not older than 3 months)
- Proof of Date of Birth (DOB): Aadhaar, Birth Certificate, Passport, 10th Marksheet
Shortcut: If you choose Aadhaar e-KYC, you don’t need to upload extra documents. Your details (including photo & signature) are fetched directly from Aadhaar.
Step 5: Pay the Application Fee
The fee depends on where your communication address is:
- Within India: ₹110 (approx)
- Outside India: ₹1,020 (approx, includes courier charges)
You can pay using:
- Credit/Debit Card
- Net Banking
- UPI
- Demand Draft (if submitting offline)
Real-life example: Paying the PAN application fee is like booking a movie ticket online — you can choose UPI, card, or net banking, whichever is easier for you.
Step 6: Aadhaar Authentication (e-KYC)
If you’ve entered your Aadhaar number, you’ll get an OTP on your registered Aadhaar mobile number.
- Enter the OTP to complete verification.
- Your photo and signature from Aadhaar will be used automatically.
Benefit: No need to scan and upload separate documents.
Step 7: Submit the Application
- After OTP verification and payment, submit your application.
- You’ll receive a 15-digit acknowledgment number on your mobile and email.
- This number lets you track your PAN card status online anytime.
Real-life example: It’s like ordering something from Amazon — you get a tracking ID, and you can check where your parcel is at any moment.
Step 8: PAN Issuance
- After successful verification, your PAN number will be generated.
- You can download a digitally signed e-PAN (PDF format) within 48 hours.
- The physical PAN card will reach your address in 7–15 working days.
Real-life example: Think of it like getting a digital train ticket immediately on your mobile, while the printed ticket comes by post later.
Applying for a PAN card online is no longer a headache. With just your Aadhaar card, mobile number, and internet connection, you can get your PAN in less than a week.
So, whether you’re a student applying for your first bank account, a freelancer starting online work, or a salaried employee needing to file taxes — this guide helps you get your PAN card without confusion.
Got it Let’s expand the offline PAN card application process in a simple, step-by-step way so even first-timers can follow along. I’ll explain in layman language with real-life examples to make it super easy to understand.
How to Apply for PAN Card Offline – Process & Centres
Not everyone is comfortable applying online. Some people prefer visiting a centre, filling a physical form, and submitting documents in person. The government has made this process equally simple through PAN Service Centres, TIN Facilitation Centres, and IT PAN Service Agents across India.
Detailed Guide to the Complete Offline Process
Step 1: Download or Collect the PAN Application Form
- You can download Form 49A (for Indian citizens) from the NSDL/UTIITSL websites.
- Or, if you’re not comfortable with downloading, simply visit a nearby PAN centre and collect the form.
Real-life example: Think of it like booking train tickets. Some people book online through IRCTC, while others still go to the railway counter to fill out a physical reservation form. Both ways work, it just depends on your comfort.
Step 2: Fill the Form Manually
- Use BLOCK letters (capital letters) while filling.
- Write clearly, avoid cutting or overwriting.
- Make sure the details (name, DOB, Aadhaar number, etc.) match exactly with your documents.
Tip: Carry a black or blue pen. Don’t rush while filling — a small mistake (like wrong spelling of name) may delay your PAN.
Step 3: Attach Supporting Documents
You need to attach self-attested copies of documents for:
- Proof of Identity (POI)
- Proof of Address (POA)
- Proof of Date of Birth (DOB)
Self-attested means: You sign on the photocopy to confirm that it’s yours.
Real-life example: Just like when you submit documents for a SIM card, the shopkeeper asks you to sign on the Xerox copy — it’s the same process here.
Step 4: Submit the Form
- Once the form is filled and documents attached, submit it at the nearest PAN centre (TIN Facilitation Centre or PAN Service Centre).
- The official there will check your documents before accepting them.
Tip: Carry originals as well. They may ask to cross-check before taking your photocopies.
Step 5: Payment of Fees
- You need to pay the PAN application fee while submitting the form.
- Payment options:
- Cash (if available at that centre)
- Demand Draft (DD) in favour of NSDL/UTIITSL (for offline submission).
Real-life example: It’s like paying exam fees — some schools accept cash, while others ask for a DD. Similarly, PAN centres may have different rules, so it’s good to confirm before going.
Step 6: Acknowledgment Slip
- After submission, you’ll receive a 15-digit acknowledgment number.
- Keep this slip safe — it helps you track your PAN status later.
Real-life example: It’s like getting a courier tracking number when you send a parcel through Speed Post.
Step 7: Processing & PAN Dispatch
- Your form and documents are verified by the Income Tax Department.
- If everything is correct, your PAN card is printed and dispatched.
- Delivery usually takes 15–20 working days.
Real-life example: Just like applying for a voter ID card, it takes some time for the government to verify and then send the card to your address.
Documents Required for PAN Card Application
Here’s a simple checklist of documents you can use:
1. Proof of Identity (Any one)
- Aadhaar Card
- Voter ID
- Passport
- Driving License
- Ration Card with photograph
2. Proof of Address (Any one)
- Aadhaar Card
- Utility Bills (electricity, water, gas — not older than 3 months)
- Passport
- Driving License
- Bank Account Statement
3. Proof of Date of Birth (Any one)
- Aadhaar Card
- Birth Certificate
- Matriculation (10th class) Certificate
- Passport
- Driving License
Pro Tip: The easiest way is to use your Aadhaar card since it covers identity, address, and DOB in one document.
If you’re not tech-savvy or don’t have access to a stable internet connection, applying for a PAN card offline is a reliable option. The process is straightforward — fill the form, attach documents, pay the fee, and wait for your card to be delivered.
Whether online or offline, getting a PAN card today is much easier than it was a decade ago.
Online vs Offline PAN Card Application – Which is Better?
| Feature | Online Application | Offline Application |
| Where to Apply | Through NSDL or UTIITSL official websites | At PAN Service Centres, TIN Facilitation Centres, or IT PAN Service Agents |
| Form Used | Form 49A (Indian citizens), Form 49AA (foreign citizens) | Form 49A (Indian citizens), Form 49AA (foreign citizens) |
| Filling Method | Fill details online on the portal | Fill details manually with pen in BLOCK letters |
| Documents Required | Aadhaar (e-KYC) is enough in most cases; else scanned copies of POI, POA, DOB | Self-attested photocopies of POI, POA, DOB (carry originals for verification) |
| Photo & Signature | Auto-fetched from Aadhaar (if e-KYC) or uploaded online | Affix passport-size photograph & sign physically on the form |
| Payment Options | Online – Debit/Credit Card, Net Banking, UPI | Offline – Cash (if accepted) or Demand Draft (DD) |
| Acknowledgment | 15-digit acknowledgment number received instantly via SMS/Email | 15-digit acknowledgment number given on a slip at the centre |
| Tracking Application | Online status check using acknowledgment number | Online status check using acknowledgment number |
| Processing Speed | e-PAN available within 48 hours, Physical PAN in 7–15 working days | Physical PAN delivered in 15–20 working days |
| Convenience | Apply from home with internet & smartphone | Requires visiting a centre physically |
| Best For | Tech-savvy users, students, employees, freelancers who want speed & ease | People without stable internet, those uncomfortable with online forms, or preferring in-person assistance |
PAN Card Fees – Online & Offline Charges
PAN card application fees vary depending on whether the communication address is within India or outside India.
| Service | Fee (within India) | Fee (outside India) |
| New PAN Application (Physical Card & e-PAN) | ₹110 | ₹1,020 |
| e-PAN only (soft copy) | ₹66 | N/A |
| Correction/Update PAN | ₹110 | ₹1,020 |
Note: Fees may change as per government updates.
How Long Does it Take to Get a PAN Card?
The time taken to receive your PAN card depends on how you apply — online or offline.
Online Application (with Aadhaar e-KYC)
- PAN Allotment: Usually within 48 hours (you can download a soft copy called e-PAN in PDF format).
- Physical PAN Delivery: Reaches your registered address within 7–15 working days after verification.
Real-life example: Imagine booking a movie ticket online — you instantly get the e-ticket on your phone (like e-PAN), and later you receive a printed ticket at the cinema hall (like the physical PAN card).
Offline Application
- Since documents are submitted manually and require physical verification, the process is slower.
- PAN Delivery: Generally takes 15–25 working days after submission.
Real-life example: Applying offline is like sending a letter by post — it takes more time to reach the destination compared to sending an email.
Tracking Your PAN Card Status
No matter whether you apply online or offline, you’ll get a 15-digit acknowledgment number.
- You can use this number on the NSDL or UTIITSL portal to track the current status of your application.
- Updates will also be sent to your registered mobile number and email.
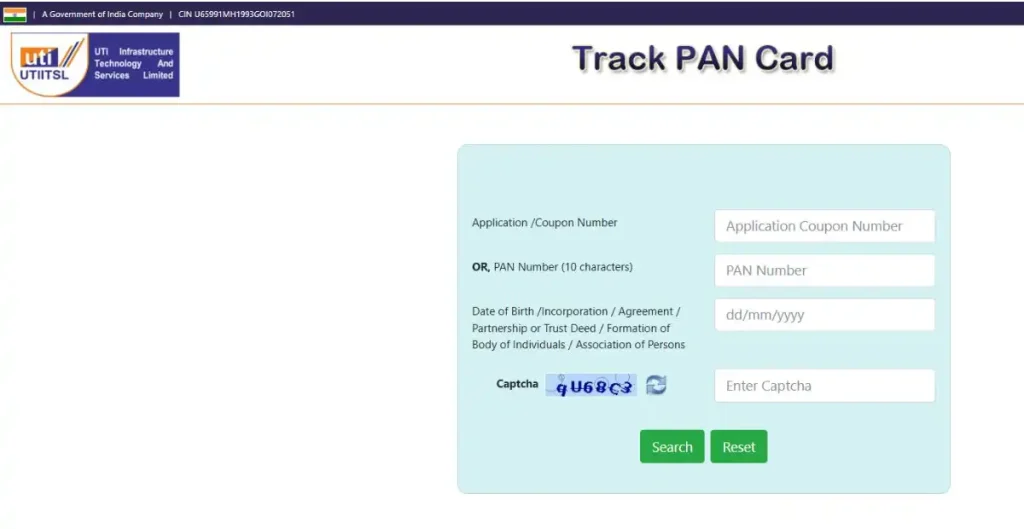
Real-life example: It works just like a courier tracking number — you can check where your PAN application is in the process (submitted, under verification, dispatched, etc.).
Summary:
- Online with Aadhaar: Fastest (e-PAN in 48 hrs, physical card in 7–15 days).
- Offline: Slower (15–25 days).
- Both methods give you a tracking number to follow your application status.
PAN Card Processing Timeline
Online Application (with Aadhaar e-KYC)
- Day 1: Submit PAN application online via NSDL/UTIITSL portal + complete Aadhaar OTP verification.
- Day 1–2: PAN number (e-PAN) is allotted and available for download in PDF format.
- Day 3–7: Application goes through verification by the Income Tax Department.
- Day 7–15: Physical PAN card is printed and delivered to your registered address.
Total Time: 48 hours for e-PAN + 7–15 working days for physical PAN.
Offline Application
- Day 1: Visit PAN centre, fill out Form 49A, attach documents, pay fees, and submit.
- Day 2–7: Documents are checked and verified manually at the centre.
- Day 8–15: Application forwarded to the Income Tax Department for further processing.
- Day 15–25: Physical PAN card is printed and dispatched to your registered address.
Total Time: 15–25 working days.
Tracking Updates
- In both methods, you’ll get a 15-digit acknowledgment number.
- Use this to track your PAN status online — just like checking courier delivery updates.
This timeline makes it clear that online (with Aadhaar e-KYC) is the fastest option, while offline takes longer due to manual checks.
Great Let’s expand this into a clear, detailed, and layman-friendly guide so readers fully understand how to update or correct PAN card details. I’ll also add real-life examples so even beginners can follow easily.
How to Update/Correct PAN Card Details
Sometimes, mistakes happen while applying for a PAN card — like spelling errors in your name, incorrect date of birth, wrong address, or even changes after marriage. Luckily, the government allows you to update or correct your PAN details online without much hassle.
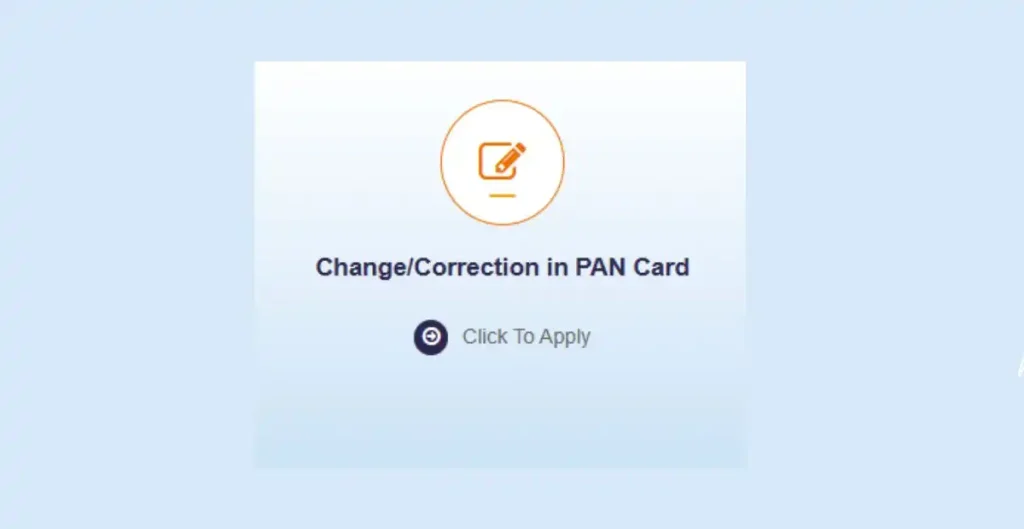
Here’s the complete step-by-step guide:
Step 1: Visit the Official Portal
You can apply for correction through either:
Real-life example: Think of this like re-ordering a corrected mark sheet from your school if your name was misspelled. You just need to go to the right authority.
Step 2: Choose “Correction in PAN” Option
- On the homepage, select “Apply for Changes/Correction in PAN Data”.
- This option is specifically meant for fixing errors in your PAN details.
Tip: Don’t reapply for a new PAN. Always choose the correction option to avoid duplicate PAN cards.
Step 3: Fill in the Form with Correct Details
- Enter your correct details carefully.
- Only update the fields that need correction (name, DOB, address, father’s name, etc.).
Real-life example: If your PAN says “Shivam Kr Gupta” but your Aadhaar and other IDs say “Shivam Kumar Gupta”, you must enter the correct version here.
Step 4: Upload Supporting Documents
To prove the correction, upload scanned copies of valid documents such as:
- For Name Correction: Aadhaar card, Passport, Voter ID, or Marriage Certificate (if changed after marriage).
- For Date of Birth Correction: Birth certificate, Aadhaar card, Passport, or 10th class certificate.
- For Address Correction: Aadhaar, Utility bills, Passport, or Bank statement.
Tip: Make sure details in your documents match the correction you’re requesting.
Step 5: Pay the Correction Fee
- The correction fee is usually around:
- ₹110 (for Indian address)
- ₹1,020 (for foreign communication address)
- Payment methods: Debit/Credit Card, Net Banking, UPI, or Demand Draft.
Real-life example: It’s like paying a rechecking fee in exams — a small charge to get the mistake fixed officially.
Step 6: Submit & Track with Acknowledgment Number
- After payment, submit the correction form.
- You’ll receive a 15-digit acknowledgment number on your mobile/email.
- Use this number to track the status of your correction request on the NSDL/UTIITSL portal.
Real-life example: Just like tracking a courier or passport application, you can check whether your correction is under process, approved, or dispatched.
Processing Time
- e-PAN update: Usually available within 48 hours after approval.
- Physical PAN card: Delivered to your registered address within 7–15 working days.
Correcting PAN details is easy — no need to panic if there’s a mistake in your card. With Aadhaar and online portals, the process is much faster than before. Just make sure you upload the right documents that support your correction.
Perfect Let’s create a list of the most common mistakes in PAN cards along with quick fixes so users can instantly identify their issue and know how to resolve it.
Common Mistakes in PAN Card & How to Fix Them
Even a small error in your PAN card can cause problems while filing taxes, opening a bank account, or applying for a loan. Here are the most common mistakes people face and how to correct them:
1. Name Spelling Errors
Problem: Your name is misspelled or partially written.
Example: PAN shows “Shivam Kumr Gupta” instead of “Shivam Kumar Gupta”.
Fix:
- Apply for “Correction in PAN” through NSDL/UTIITSL.
- Upload Aadhaar card, Passport, or Voter ID as proof of correct name.
2. Mismatch Between PAN and Aadhaar
Problem: Your name or date of birth on PAN doesn’t match Aadhaar, causing linking issues.
Example: PAN shows “Anjali Gupta” but Aadhaar shows “Anjali Rani Gupta”.
Fix:
- Decide which version is correct.
- Update PAN through the correction form and submit supporting proof.
3. Incorrect Date of Birth (DOB)
Problem: Wrong DOB printed due to form error.
Example: PAN shows “05/10/1993” but your actual DOB is “10/05/1993”.
Fix:
- Apply for correction and upload Birth Certificate, Passport, Aadhaar, or 10th Marksheet as proof.
4. Wrong Father’s Name
Problem: Spelling mistakes or incomplete father’s name.
Example: PAN shows “Rajesh” while full name is “Rajesh Prasad”.
Fix:
- Update PAN with correct details.
- Provide Aadhaar/Passport/Voter ID showing father’s full name.
5. Address Errors
Problem: Wrong address or outdated address on PAN records.
Example: PAN shows your old address where you no longer live.
Fix:
- Apply for address correction.
- Upload Aadhaar card, Passport, Utility Bill, or Bank Statement (not older than 3 months).
6. Photograph Issues
Problem: Blurry, unclear, or wrong photograph on PAN card.
Fix:
- Reapply with the correct photograph.
- Submit correction form with fresh passport-size photo.
7. Signature Mismatch or Missing Signature
Problem: Signature on PAN doesn’t match bank/official records or is missing.
Fix:
- Submit a correction form with the correct signature.
- Some cases may require physical verification.
8. Multiple PAN Cards Issued
Problem: By mistake, you hold two PAN cards (illegal as per IT Act).
Fix:
- Keep the correct PAN card.
- Apply for surrender of duplicate PAN via NSDL/UTIITSL.
Most mistakes happen due to:
- Typing/spelling errors while filling the form.
- Not matching Aadhaar details exactly.
- Submitting old or invalid documents.
Always double-check your details before applying.
How to Download e-PAN Card
An e-PAN is the electronic version of your PAN card, issued digitally by the Income Tax Department. It is a valid and legally accepted document that can be used in place of the physical PAN card. The e-PAN comes in a PDF format, digitally signed, and can be downloaded anytime if you lose or misplace your physical card.
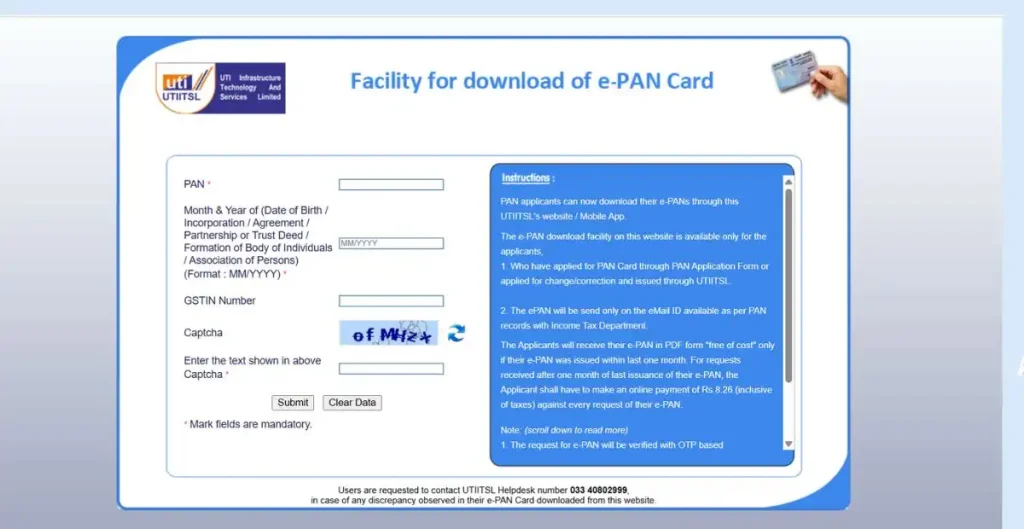
Steps to Download e-PAN:
- Visit the Official Portal: Go to either the NSDL e-PAN download page or the UTIITSL e-PAN download page, depending on where you applied for your PAN card.
- Enter Required Details: Provide your PAN number, Aadhaar number, or Acknowledgment number (received during the application).
- Authenticate Your Identity: You will receive a One-Time Password (OTP) on your registered mobile number or email linked with Aadhaar. Enter the OTP to proceed.
- Download e-PAN PDF: Once authenticated, you can download the PDF version of your e-PAN card instantly.The PDF file is password-protected (usually your date of birth in DDMMYYYY format).
- Usage of e-PAN: You can use the e-PAN for all financial transactions, KYC verification, or anywhere your PAN card is required.
Tip: The first download is free (for newly allotted PANs), but for re-download, a nominal fee (₹8–₹66 depending on the portal) may apply.
Perfect Let’s add a dedicated section on e-PAN download fees for clarity:
Fees for e-PAN Download (NSDL vs UTIITSL)
Downloading an e-PAN is usually free for applicants who have just been allotted a new PAN. However, if you want to re-download it later, a small fee applies. The charges differ slightly depending on the portal:
1. NSDL (Protean eGov Technologies) Portal
- Fresh PAN Applicants: First download is free.
- Re-download of e-PAN: ₹8.26 (including taxes).
- Payment can be made online through credit/debit card, UPI, or net banking.
2. UTIITSL Portal
- Fresh PAN Applicants: First download is free.
- Re-download of e-PAN: ₹8.26 (including taxes).
- Payment accepted via online modes only.
Once the payment is made, you can instantly download your e-PAN in PDF format.
Note: The downloaded PDF is password-protected. The password is your date of birth in DDMMYYYY format (e.g., if your DOB is 15th August 1995 → password will be 15081995).
Got it — I’ll expand the content in detail with ShivamKumar as the only example throughout the article. I’ll add more explanations, layman-friendly comparisons, and step-by-step storytelling so that any reader (even a beginner) can clearly understand the whole process of linking PAN with Aadhaar.
How to Link PAN with Aadhaar: A Detailed Step-by-Step Guide (Example of Shivam Kumar)
The Government of India has made it mandatory to link your PAN card with your Aadhaar card. If you don’t do this, your PAN can become inactive, which means you won’t be able to use it for filing taxes, opening bank accounts, or even making high-value transactions.
Many people get confused about how to complete the linking process. To make things simple, let’s understand this step by step by following the story of Shivam Kumar, a salaried professional who is linking his PAN and Aadhaar.
Method 1: Linking PAN and Aadhaar Online (Shivam’s Experience)
This is the most convenient way because you can do it from home using your mobile or computer.
Step 1: Visiting the official website
Shivam goes to the Income Tax e-filing portal on his laptop. Right on the homepage, he notices a section called “Quick Links” where there is an option called “Link Aadhaar.”
This is just like standing in a railway station and seeing a big signboard that directs you to your platform. You don’t need to search much — the option is right in front of you.
Step 2: Entering details carefully
The form on the screen asks for:
- PAN number (10-digit alphanumeric code)
- Aadhaar number (12-digit unique number)
- Name as per Aadhaar
Shivam enters:
- PAN: ABCDE1234F
- Aadhaar: 123456789012
- Name: Shivam Kumar
Since his PAN and Aadhaar both have the same spelling of his name, the process is smooth. If there was even a small difference (like “S Kumar” vs “Shivam Kumar”), it could have caused an error.
Step 3: OTP authentication
Next, the system sends an OTP (one-time password) to the mobile number that is registered with Aadhaar.
Shivam’s phone buzzes with a 6-digit OTP. He enters it on the website and clicks Submit.
Think of OTP as a digital lock — only the person with the right Aadhaar mobile number can open it.
Step 4: Confirmation message
In just a few seconds, a message pops up:
“PAN ABCDE1234F has been successfully linked with Aadhaar 123456789012.”
Shivam feels relieved. He didn’t have to step outside his home, and the process was completed within minutes.
Method 2: Linking PAN and Aadhaar via SMS
Not everyone is comfortable using websites. For such people, the SMS method is a blessing.
Step 1: Typing the SMS
Shivam opens the SMS app on his phone and types the message in the required format:
UIDPAN 123456789012 ABCDE1234F
Step 2: Sending the SMS
He sends it to 567678. Within a few minutes, he gets a reply saying:
“Aadhaar 123456789012 is linked with PAN ABCDE1234F.”
This method is just like ordering something through a text message — quick, simple, and no internet required.
Method 3: Linking PAN and Aadhaar Offline
Sometimes people face issues like not receiving OTPs (if their Aadhaar mobile number is not updated) or not being familiar with digital services. In such cases, the offline method works best.
Step 1: Visiting a PAN service center
Shivam goes to the nearest PAN service center (NSDL/UTIITSL office).
Step 2: Filling out the paper form
He asks for the Aadhaar-PAN linking form. The form is simple — it asks for PAN, Aadhaar, name, and a few personal details.
Step 3: Attaching documents
Shivam attaches photocopies of his Aadhaar card and PAN card (self-attested).
Step 4: Submitting the form
He submits the form, and the staff verifies his details. Since everything matches, the linking request is accepted.
In some cases, if names don’t match exactly, biometric verification (fingerprint or iris scan) may also be done.
Step 5: Confirmation
After about 10–15 days, Shivam receives confirmation that his Aadhaar and PAN have been linked.
How Shivam Checks the Status
A few days later, Shivam wants to make sure everything went smoothly.
- He goes back to the Income Tax e-filing website.
- Click on “Link Aadhaar Status.”
- Enter his PAN and Aadhaar number.
The screen displays: “Your PAN ABCDE1234F is already linked with Aadhaar 123456789012.”
This is like tracking an online order — once you enter the details, the system shows you the status instantly.
Challenges Shivam Faced
Even though the process is simple, Shivam faced some common problems:
- OTP not coming: His father once tried linking, but OTP didn’t come because the mobile number wasn’t updated in Aadhaar. The solution was to visit an Aadhaar Seva Kendra and update the mobile number first.
- Name mismatch: If Shivam’s PAN had “S Kumar” but Aadhaar had “Shivam Kumar,” he would need to update one of the documents to make them match.
- Missed deadline: Shivam learned that if someone misses the government deadline, their PAN becomes inactive. To reactivate it, they may need to pay a fine and then complete linking again.
How Much Time It Took for Shivam
- Online method: Done instantly (within minutes).
- SMS method: Linked within a few minutes.
- Offline method: Took about 10–15 working days.
For Shivam Kumar, the easiest way was the online method with Aadhaar OTP — quick and hassle-free. The SMS method was also convenient, while the offline option worked as a backup for people without internet or Aadhaar-linked mobile numbers.
The key learning:
- Ensure PAN and Aadhaar details match (especially name and date of birth).
- Make sure Aadhaar has the correct mobile number linked.
- Don’t wait until the last date — complete linking in advance to avoid penalties.
By following the same steps as Shivam Kumar, you too can link your PAN with Aadhaar without confusion or stress.
People Also Ask PAN Card in India: Complete Guide (Apply, Update, Download & Link Aadhaar)
What is a PAN card?
A PAN (Permanent Account Number) card is a 10-character alphanumeric ID issued by the Income Tax Department. It acts like a financial identity card and is required for filing taxes, opening bank accounts, or making large transactions.
Why is a PAN card important?
Without a PAN, you can’t file income tax returns or invest in shares/mutual funds. Banks won’t allow high-value transactions, and you may face higher tax deductions (TDS). It’s a must-have document for anyone dealing with money in India.
Who needs a PAN card?
Every Indian earning money — whether salaried, self-employed, student freelancer, or business owner — needs a PAN. Companies, trusts, and even NRIs with financial dealings in India also need one.
Can a student apply for a PAN card?
Yes. Even if a student has no income, they can apply for a PAN card using Aadhaar as proof. Many students need PAN for scholarships, opening a bank account, or starting freelancing.
How do I apply for a PAN card online?
You can apply through NSDL (Protean) or UTIITSL portals. Just fill Form 49A, upload Aadhaar or documents, pay the fee online, and complete Aadhaar OTP verification.
What is an e-PAN card?
An e-PAN is a soft copy of your PAN in PDF format, digitally signed by the Income Tax Department. It’s legally valid and can be used anywhere just like the physical PAN.
Is PAN card accepted as valid ID proof everywhere?
Yes, PAN is accepted as government-issued ID proof for KYC, banking, and verification. However, it doesn’t mention your address, so for address proof, Aadhaar or passport is required.
How can I track my PAN application status?
Use the 15-digit acknowledgment number you get after applying. Enter it on the NSDL or UTIITSL portal to check if your application is under process, approved, or dispatched
Can I hold more than one PAN card?
No. Having multiple PAN cards is illegal. If you have two, you must surrender one immediately. Otherwise, you may face a fine of up to ₹10,000.
Final Thoughts
The PAN card is much more than just an identity card – it is your financial fingerprint in India. From applying online in a few clicks to updating, downloading e-PAN, and linking with Aadhaar, the process is straightforward. Whether you’re an individual or a business entity, getting a PAN card is the first step to financial inclusion and tax compliance in India.